Bicycle Week is Coming up

As every year for many years now in May, bicycle week is upon us. Amherst puts in its fair share of activities. See more info on this poster here.

If you followed this blog, you know what I will bring to the Friday bicycle show – An elegant cargo bike I finished building in time for this occasion.

If you want to know more about what that Friday morning holds, see last years entry.

To search events you may be interested in, go to the Calendar of Events.

Posted in Cargo Bicycling | Leave a comment

All that happened this year

It’s about a year ago I have started this blog (Celebrating with this picture, made during the ). I initially set out to write every other week, but for over half-a-year I ended up being a ‘regular’ weekly blogger. I did slow down this spring. But lots have happened.

My cargo bike experience has definitely expanded. Greatly, as I consciously tested what can be carried on a bike, what type of bike is best for what task, and what are my own limits. Here are some of those limits – in excess of my own almost 200-pounds weight:

  • On the freshly finished longjohn-type bicycle I carried a bit over 220 pounds. If the front wheel is properly filled I probably can carry more but so far didn’t need to.
  • On the longtail Yuba Mundo I carried 280 pounds. Other than handling it while stopped was challenging the actual moving the weight was fine. I didn’t feel any torque or other behavior scaring me.
  • On the Long Nose bike as I sometimes call the Frontloader, I carried two people. Yes filling up the tires are important here too.
  • On an electrified XtraCycle conversion I didn’t dare to carry more than 140 pounds – including the . It does start to torque and move in some hard-to-describe sideway-ish manner at that weight. But the electric assist sure helps a lot: I can reach my destination shaving off 1/3 of the time needed especially destinations involving uphill, and mostly staying in one gear.
  • On a bamboo trailer I carried anywhere between 55 to 300 pounds feeling close to the limit, depending on how that trailer was built.
  • On a Bikes-at-work trailer at the end of this linked post I carried 495 pounds. Know it because I measured it. That weight plus the 45 pounds of the weight of the trailer was close to what I can manage on a medium uphill, and still keep my balance.
  • On the box trike I carried about 350 pounds, but felt I wasn’t even close to what the bike could take. But that trike, because of its build, cannot go fast even when empty.

I will continue this discussion later, but for now I would like to point out, that Bicycle week is happening next week, May 13 to 17 in Amherst and more programs, also during the preceding and following weekend regionally and all throughout Massachusetts. Come to our biggest event on May 17 Friday on Amherst common, a Commuter breakfast, Bicycle show and Work with Bikes event series from 7am to 2pm.

Posted in Cargo Bicycling, Uncategorized | Leave a comment

On-road Bicycling

CyclingSavvy Pioneer Valley is excited to offer its first class ever, in Springfield!

CyclingSavvy (cyclingsavvy.org) is a wildly successful, paradigm-shifting, nation-wide cycling training program.

Learn essential skills for successful bicycle travel.
Bicycle travel can be safe, easy, and carefree.
Take control of your experience on the street.
Go anywhere, at any time, under any conditions.
Feel relaxed, confident, and powerful.

Saturday, 05/04, 9:00AM-4:00PM, 3350 Main St.
Sunday, 05/05, 1:00PM-4:30PM, 11 Wilbraham Rd.

Need-based scholarships available. Tuition is $75, or $15 with scholarship.

More information: cyclingsavvy.org/2013/04/first-class-ever-in-the-pioneer-valley/
Register on-line at eli-damon.info/cyclingsavvy/registration
Contact Eli Damon at 413-530-3861 or
cyclingsavvy-pioneer-valley@eli-damon.info.

Posted in Cargo Bicycling, Reskilling Workshops | Leave a comment

Adjusting the Adjustables II

Now that we vetted you on the basics in a previous post let’s see the rest.

Oiling and adjusting seems to be the two most important maintenance tasks on a bicycle (There are others, like periodically tightening all the bolts, as having them go loose may have pretty bad consequences, but that somewhat depends on who tightened those bolts and directions usually are in the user’s manual. Another is changing the brake pads, but that you only need to do rarely once they wear down. Or truing a wheel, which takes a lot of playing around, at least for me). Oiling we also looked at before, so by now we can take on a bigger fish, and review break and dérailleur adjustment.

I am not going for perfection here, as you see, just a solid overview of what to do. You can access further details with many pictures on the Internet by doing searches on Google, like “adjusting a rear derailleur” or “setting the brakes on a bike”, etc. Wikihow has a pretty good set of information in general. Other websites also have information like Bicycle Tutor

Anyway, my ground rule is observe how it works and adjust once you got the hang of what is happening and what should happen. Having another (functioning and similar) bicycle available is a bonus. Here are what usually needs adjusting:

Brakes

(If you have them: if you don’t, get some, you may need something better than pedaling backwards one day): the alignment and distance of brake-pads from the breaking surface, that can be the disc on a disc brake, or the wheel rim at most other cases. You do this adjustment, so you can safely, efficiently (and quietly, without squeaking) stop. Why don’t I write the symptom of breaking malfunction, and how to fix them – most of these will apply only to rim brakes – disc brakes are less frequent at this point and harder to get to and less error prone so I will leave them for now.

So say you are biking and need to slow down, so you pull the lever, and… you slow down, indeed, but not fast enough. You can increase the braking effect with pulling both levers engaging both brakes, or tightening the cable that connects the lever with the brake pad. Most brake levers come with a piece that is where the cable leaves the lever, and screws in and out. Screw that thing out with your fingers until you feel the brake engaging when you pull on the lever. If it screw is already out, you need to tighten the cable.

Say you are rolling, then brake, and not only nothing happens, but it is also too easy to use the lever. You realize you didn’t hook back the wire for the brake. I don’t detail it further.

You are rolling the first time in months, and brake… and try harder, but you can’t move the lever. Ah, the cable got wet and now it is rusty. Sometimes taking it apart and oiling it helps, sometimes you need to change the cable…

Dérailleurs

Or speed/gear-ratio-adjusting devices. Most bikes have a front and a rear dérailleur, and if they don’t, they are either single speed, or have an internal gear hub, where all gears are stuffed inside the rear wheel-hub. Most also have cables similar to brakes and the same maintenance applies.

Both front and real dérailleurs tend to have two screws sticking out of it, almost inviting you to put a ‘scwudwiwer’ to their heads. These adjust the range. so if you find you don’t hit all speeds/cogs while trying to use the lever, or your chain falls off the end of the cog-set, those screws may fix the issue.

Set a dérailleur to the largest cog the chain tends to fall off of. Then looking into the body of the dérailleur, see where is the end of one screw in position to the body. If close, but not quite touching, that may be the problem, tighten the screw until it lightly touches. If quite far away, that is the other screw, don’t tighten the screw.

Alternatively, if you can’t get onto a cog, set the dérailleur as close to it as you can, and examine the ends. If one touching loosen that screw and test your thusly adjusted range.

Since these are finer instruments, it may be that there are other problems present. I have a rear dérailleur, that doesn’t want to change to larger cogs, only when I push it by hand. I oiled it, set the limits, etc., but it doesn’t budge. It may be bent, worn out, or clogged by greasy dirt I may have to change it. But I feel I tried my best to help it work, so if I take it to the bike shop, I may learn something new when I see the bike next and have a chance to talk to my guy there.

————————
Adjust air-pressure in the tires

  • Up, after a long break in using it, so you don’t waste your energy uselessly,
  • Either way, and accommodate the type of surface you are riding on best
  • Or a bit down, when the weather gets warm, so you don’t blow the tire.
Posted in Cargo Bicycling | Leave a comment

Bike building project: Completing a Bike

Out of the tree that we planned to build (see previous posts), one is completed. The big space between the front wheel and the handle bar is the cargo area, that folds up vertically for storage. As you can see below, it was tested by multiple people and some (live) cargo as well. No long-distance trips yet happened on it, but according to some reports it works very smoothly, according to others it feels first a bit weird with the front wheel way out front (we will have to call it “very front wheel”) but can be gotten used to after a while. Sharp U-turns are challenging/impossible, but easier to do towards the left…


Another bike, a second cargo of the same kind has made serious headways during this weekend. Although the same kind it is the result of another planning mind, thus many things around the front is going to end up quite a bit different. Meet Jeff, who has been working on it creatively and committedly in spite of having just started a new job full+ time (luckily, working with metal of all kinds).


Posted in Cargo Bicycling, Uncategorized | Leave a comment

Adjusting the Adjustables

One of the reasons I feel more comfortable riding my bike than driving is because I know how to fix most problems that can occur with a bike, and the total tool-set that makes it possible is with me all the time (and is less than a pound of weight). Luckily, bicycles are fairly simple instruments, and they won’t electrocute or burn you or chop your arm off if you open them up. Most of the time you don’t even have to waste time with opening them up because there is no lid at all, the mechanism is right in front of your eyes in easy-to-access places.

Also, most adjustables we will look at are not adjustable for luxury, but for necessity/functioning. For example you don’t adjust your seat-post only for comfort, but also for better pedaling efficiency and so you don’t wear out your knees over time. Likewise your break is not adjustable for sheer beauty but because adjusting them properly make them work better, or work at all. So do know the basics: it is better to get oily fingers than getting stuck on the road for hours.

Almost all repair process is not only free information but also easy to find. WikiHow has a pretty good set of information in general about this subject. Also does Bicycle Tutor and Sheldon Brown’s website. And a Google search will bring up a plethora of information too. So if you have a computer, or access to one, you are in good hands.

Nevertheless I will go through some points of adjusting. I am hoping that if you didn’t do anything towards fixing or adjusting your bike maybe you try, and then the ice will break and the next act will come easier. And hopefully you will feel the empowerment I feel since I dare to handle my bike, not just pedal it.

Well, let’s look at the seat-post. You either have a quick-release (a little lever) where the frame meets the tube sticking out of the bottom of the seat, or have some sort of a nut there, to tighten the frame around the seat stem. Loosening either will allow you to raise or lower the seat. Rotating the seat up and down can be adjusted just under the seat, at the top of the seat post. Look for the double nut or Allen wrench hole to make this adjustment. And do own an Allen wrench, it is indispensable for most bikes made this century.

Set the seat so your toes safely reach the road surface without you having to fall in trying. The lower the post is, the safer the stops may be, but also the lower the seat is set, the less effective you are on the saddle, and the more danger pedaling is to your knees on the long term.

Adjusting the handle bar is not harder – if the range it has meets your comfort range. For me usually the highest setting is way too low, as I like upright bicycling, and also because I appreciate comfort a lot more than speed, and the low handlebars are usually to make you think your air dynamics are better, but really it is just a cheaper solution in general to make them lower. When you go for comfort, it is helpful to start with an upright bicycle instead of a road bike or a department store type mountain bike. Otherwise you run out of handlebar-stem length and/or cable length (the brake cables and derailleur cables may be too short), before you reach your comfort range, and then everything gets a lot more complicated. Anyway, usually there is not much stem-length to adjust the handle bars, but you can check that out by loosening the screw on top of the handle bar stem, tapping it lightly with a hammer to get the rig loose, and pull the stem out up to the mark for maximum before re-tightening – also, make sure the front wheel is aligned well to the handle bar – it is annoying to always have to steer left in order to go straight… And be careful not to adjust the handle bar without a few inches in the socket (my minimum is three inches), otherwise the whole steering may be unsafe.

Do I need to mention pumping up the tires? It is just so simple, but why not. I find it is the most beneficial to fill the tires up to the maximum pressur that is suggested on the side of the tire for normal road surfaces, or less for softer surfaces or smoother riding. The lower the pressure the more effort it takes to pedal somewhere though. Well, all this is easy if you have a pump with a pressure-meter of course. If not, just make sure, that you can’t press the tires in one third of the way or more towards the rim, no matter how strongly you try. Even if you sit on the bike. Or, create some useful neighborhoodly connection by going around in the ‘hood, and ask for a pump with the little air-pressure instrument attached.

One more thing about tires: there are two kinds of valves, that are not inter compatible. make sure you have a pump that can fill your tires. However there is a converter from the wider Schrader valve to the narrower Presta Valve, that is a simple instrument indeed and costs maybe a couple of dollars.

Next time we will look at the real adjustment jobs, namely adjusting the brakes and the derailleurs.

Posted in Cargo Bicycling | Leave a comment

Sidekick Trailer

A few weeks ago I have seen a picture of the sidecar for a longtail bicycle, which is called Xtracycle. Xtracycle is a cargo bicycle, the earliest of the longtail type, and is famous for the very flexible platform and large amount of accessories. This sidecar is one of them. As you can see from the picture, it has only one wheel, is positioned next to the bicycle, and can be folded up.

I thought it was a marvelous idea. So I started to think in what form could it be replicated so it attaches to a regular bike – just for smaller loads. The main complication is, that a regular bike doesn’t have a lot of space on the back to have a sidecar be hooked up. And even most of the little space it does have on the frame to get something mounted on, is overlapped by the foot of the pedaler, so if anything sticks out to the side, it would get caught.

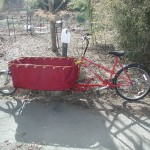
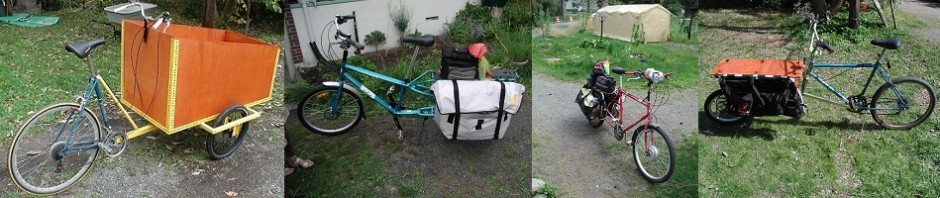
Well, I did dare to buy the 40 pound load, and mounted it onto the sidekick all right. The roads were mostly cleared by that time, so I got home mostly unscathed. The only thing that happened was that the arm, which was mounted to the chain-stay part of the bicycle frame did get loose, so I had to stop on the way home to put a rope around both and fasten them to each other. And in case you were wondering, here is a picture of the trailer when I folded it up after the trip. Still a little bit askew, due to the loose arm. And, of course, not as quick to get folded up as the Xtracycle sidecar; it takes a bungee cord to hold it in place.

And to better show the amount of snow we got, here is a picture of the chickens trying to find something edible in the narrow path I dug in the snow to be able to get to their coop.

Posted in Cargo Bicycling | Leave a comment

Bike Building Project: the Team

A few weeks ago in a previous post I have described some of my planning efforts for building a bike here.

When I got into building cargo bicycles I set up a rig to be able to build long wheelbase bikes with good alignment, and immediately tested it with building the Front-Loader. And a few months ago I figured out, that a friend of mine, who welds a lot, wants to build a cargo bicycle. We right away made plans of helping each other out with various bike-building projects.

Looking forward to that I cleaned up the Neighborhood Bicycle Resource Center a tad, until I though it will be good to work with someone who actually knows how to weld, and didn’t get all his knowledge on it out of books, like I had. And past weekend this friend of mine came over to start on his cargo bike.

We cut up a BMX bike to use its headset, and welded a strong pipe onto the crank-set of an adult bike to serve as the connector piece between the front and rear end. We almost made it far enough in one day to have a ‘rolling frame’, meaning the front part and the real part welded into a single unit – I think the hardest part of the job, as it is the most important and most difficult to have proper alignment at that stage.

The plan is, that once we are done with this project, and if he still has time in between carrying heavy loads using the new cargo bike, we would start working on the Sylph-alike bike. Hopefully by the event of bicycle week both bikes will be ready.

Posted in Cargo Bicycling | 2 Comments

Frontloader Fun from Spring

A friend of mine sent me these pictures. I thought with all the snow outside they will bring back the lush of spring for a moment.

The bicycle is home built, and stands up for the use very well so far. Plus it gives way of good conversations while pedaling. I call it ‘FrontLoader’, or ‘LongNose’, alternatively. It gets a lot of smiles all over town. And Marianne likes it too for the comforts of not pedaling.

Posted in Cargo Bicycling | Leave a comment

A New Project: the Planning

Well, since my first post on this subject, I started to draw what exactly I would want to build. You can judge how well it matches to the original design here.

I have the mindset that anything I do must have some practical purpose, since I live in a fast-changing society, where it is easy to be drifted to the fringes unless I speedily acclimate. So instead of copying the Sylph, that the Duryea brothers built over a century ago, I would create a practical bicycle while observing the uniqueness of their original design.

On the practical side I need cargo area(-s) included in the design, maybe ease of ride and transportability on the bus, as added bonuses. On the side of style I want to use all the features of the Sylph that still makes it possible to carry cargo on the bike.

So through many drawings I boiled my ideas into this design. On paper this is of size 1:10 meaning that I drew the 36 inch wheel as 3.6 inches (I know, I know, it might be 3 5/8 or so, as that is on the US ruler). So, so far I have a Nu-Vinci 360 hub built into the giant rear wheel, that makes it possible to shift but doesn’t add a dérailleur, which also has a roller brake – disc brakes would have been too modern looking so I was suggested the roller brake version of the hub. It will also have a low step-through frame that has a hinge in the middle like the Sylph, supported by wire suspension, a bent seat post, hopefully with the old-fashioned seat mount, and a spoon brake brake on the front in the style that my first bike, a German-made Steiger, had.

What is quite different from the Sylph is the geometry: the longer wheelbase allows for more stability as well as for a larger cargo area.

And those comments on the top of the pages show that not all issues are resolved. I don’t know how to make a rear fender due to the unusual wheel size, or how to make the hinge position finely adjustable, that probably means the minuscule adjusting of the wires, that lead from the back axle to the bottom of the seat post, then on to the bottom front part of the frame.

Of course I didn’t get to this plan immediately. Here are some of my other attempts, just for fun:-)

Posted in Cargo Bicycling | Leave a comment